Porting an active Windows 7 installation to New Hardware -howto
GOAL:
To Transfer an active windows installation to new hardware.
What you will need:
– Basic computer hardware knowledge
– Your Windows 7 Product Key
– Old windows machine still in working order.
– New tower without hard drive.
– The driver for the Wired of Wireless network controller of the NEW hardware.
– The ability to follow a guide.
Warning:
While these steps have been tested by myself, I can make no guarantees that this will work for each and every setup. As good practice dictates, you should always backup your most important items (pictures, documents, movies, music, favorites, etc…) to some kind of external media (DVD, Flash Drive, External Hard Drive) as a precaution. YOU HAVE BEEN WARNED.
Preface:
Have you wanted to upgrade your computers components, but was not crazy about the idea of having to re-install windows and all of your programs and personal files? Well, no need to fret, as windows supports a utility for doing just that. This article is written from a Windows 7 perspective, but the same steps can be performed under Windows Vista with more or less the same results.
Step 1
Prepare your system. REMOVE YOUR CURRENT USER PASSWORD(s). Make sure your computer is exactly how you want it. Install any software or updates that you want included on the new machine. Remove any junkware or programs that you do not want. Empty your recycle bin. Much of this is optional, but does not hurt.
Step 2
Navigate to the “ C:\Windows\System32\sysprep ” directory.
Launch the “sysprep.exe” program.
What this utility will do is allow you to ‘Generalize’ the system. By generalizing your system, you are for all intents and purposes wiping out all of your installed drivers. When you wipe out the installed drivers, you can place your current hard drive into a new hardware environment.
Step 3
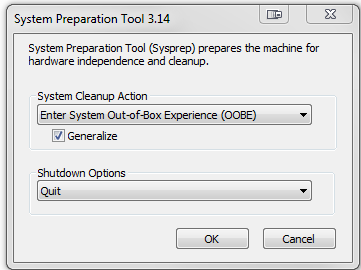
Now that you have sysprep.exe utility loaded, you will want to do set the options EXACTLY as seen below:
System Clean up action: Enter System Out-of-Box Experience (OOBE)
Generalize: Checked
Showdown Options: Quit
Make sure that these settings are EXACT. This is crucial for the following steps.
Once sysprep.exe is finished it will exit. There will be no user input. What this is has done is generalize the system, and restored the out of the box state (OOBE).
Step 4
At this point in time you will want to shut down your computer. Unplug the machine (remove the battery if on a laptop) and remove the hard drive.
You can now install the hard drive into your new machine, and power it on.
Step 5
Have your product key ready, as you will need it to finish the installation. The OOBE wizard will take you through the initial setup. Keep in mind that your current username will be in use, and you can not reuse it. What I would recommend is setting the username to something random or generic, perhaps the manufacturer of the computer, or your favorite animal or food.
Step 6
When the computer loads the welcome screen for the first time, LOG INTO YOUR OLD USER ACCOUNT, DO NOT LOAD INTO THE NEWLY CREATED USER.
Step 7
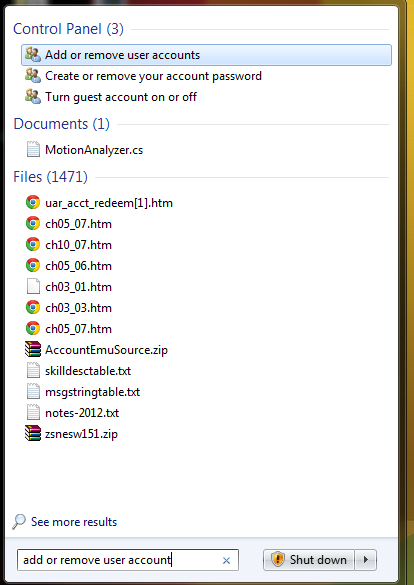
Click start orb. In the run box type “add or remove user accounts” and hit enter. When the following window opens, select the newly made user account. Then select “Delete Account” from the left had column. Finally select Delete Files.
Step 8
Make sure you have your Ethernet adapter installed (hopefully you obtained the driver prior as suggested). Try to run Windows Update to install your basic hardware, or manually install your new hardware. Once you have installed your new hardware, CONGRATULATIONS you have successfully ported your old install to new hardware!


Thanks on creating one of the most stylish blogs I have come across in a long time! It’s truly incredible how much you are able to take away from some thing simply because of how aesthetically gorgeous it is. Youve created a fantastic be site fantastic graphics , structure. site!
Thanks for expressing your ideas here. The other element is that if a problem comes up with a personal computer motherboard, individuals should not consider the risk involving repairing that themselves for if it is not done correctly it can lead to irreparable damage to the whole laptop. It is usually safe to approach the dealer of your laptop for any repair of motherboard. They’ve already technicians with an expertise in dealing with laptop motherboard challenges and can get the right diagnosis and execute repairs.
I’m extremely impressed along with your writing talents and also with the structure on your blog. Is this a paid subject matter or did you customize it your self? Anyway keep up the nice high quality writing, it’s uncommon to peer a nice blog like this one these days..
I just want to mention I’m all new to blogging and site-building and seriously loved this blog. Likely I’m planning to bookmark your blog post . You really come with incredible posts. Thank you for sharing with us your web-site.
Woah this blog is fantastic i like reading your articles. Keep up the great work! You already know, a lot of persons are looking around for this information, you can help them greatly.